The Ultimate Guide to Building a RAG Pipeline with n8n
by Tom Crawshaw
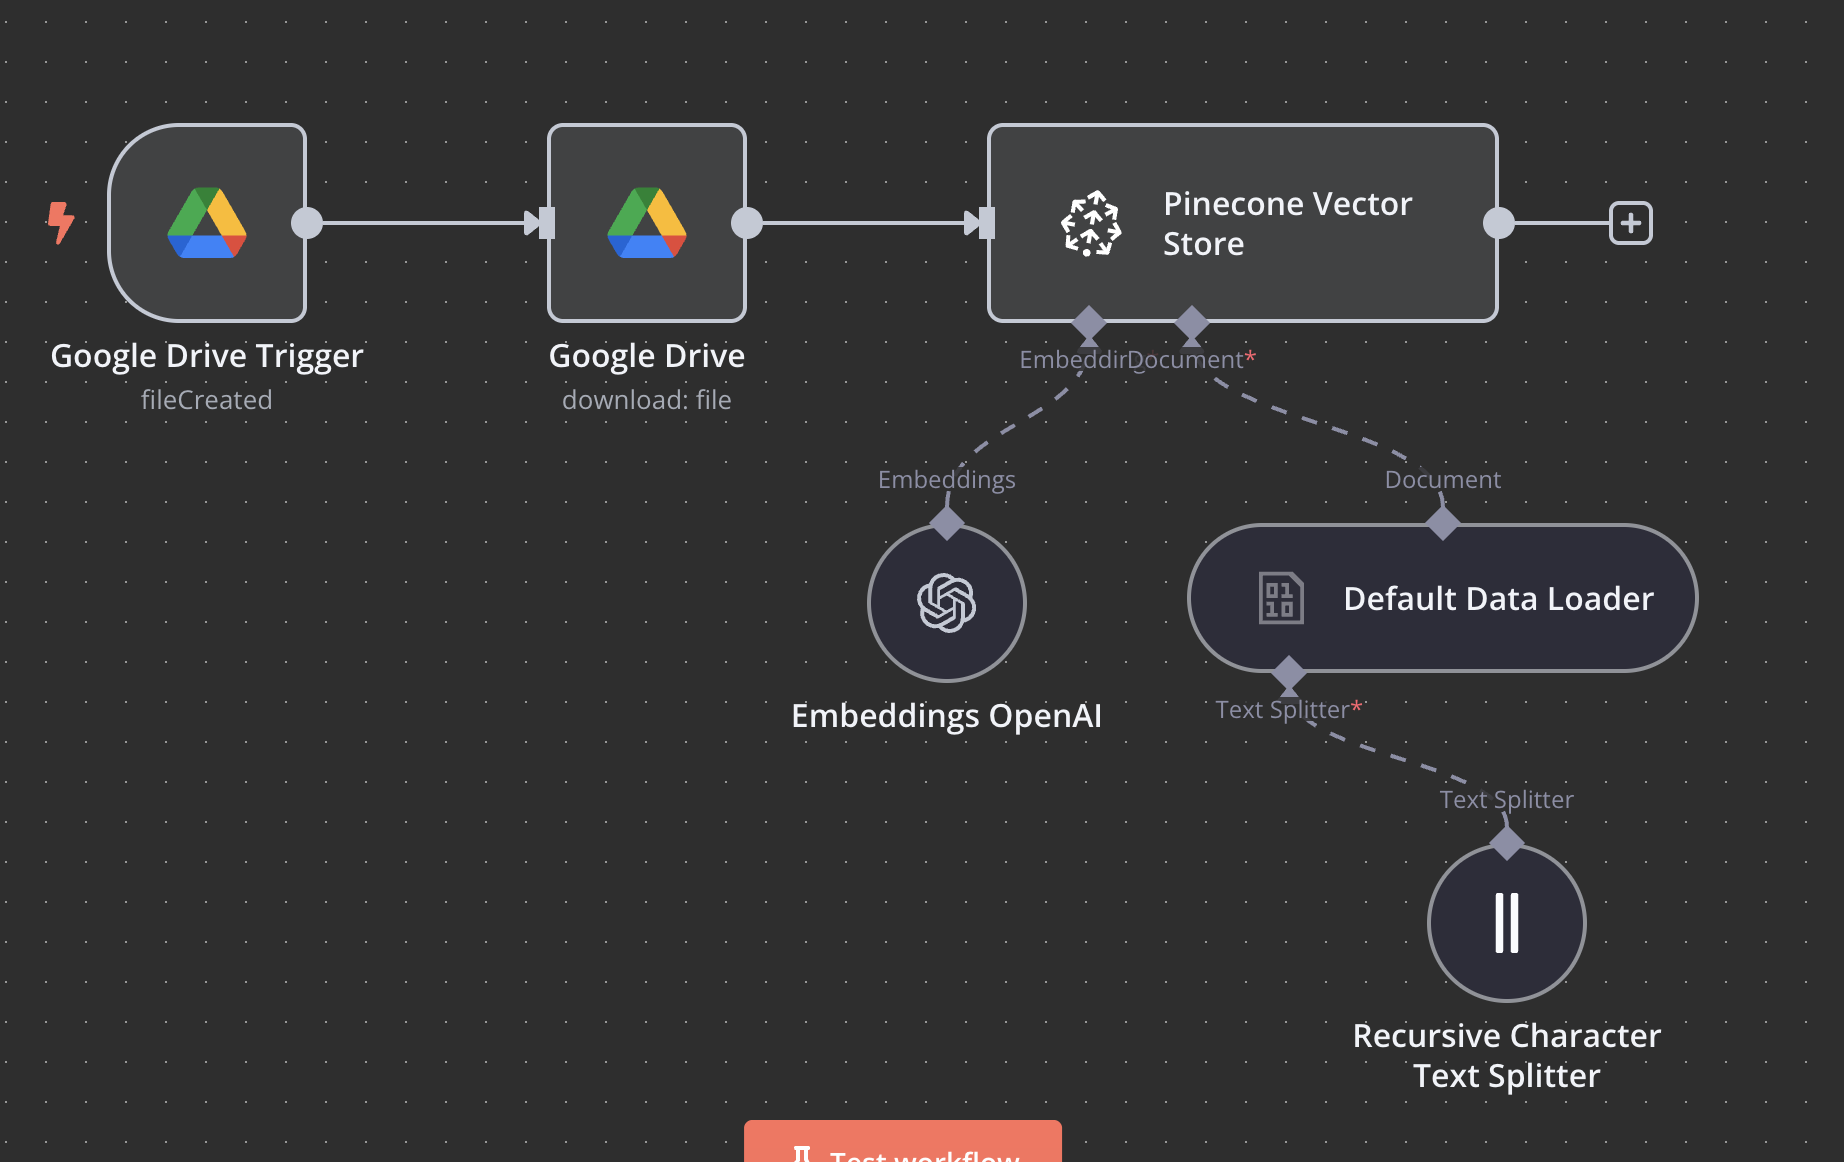
This n8n RAG tutorial will show you how to automatically convert any document you upload to Google Drive into searchable embeddings stored in a Pinecone n8n vector store. Your AI agents can then query this n8n knowledge base for precise, contextual responses instead of generic outputs. This is a powerful alternative to building with LangChain in n8n.
What this n8n RAG Workflow Does
- Monitors Google Drive for new files
- Downloads and processes documents automatically
- Splits text into optimal chunks
- Creates embeddings using OpenAI
- Stores everything in Pinecone for lightning-fast retrieval
Why Not Use LangChain?
While you can use LangChain in n8n, building the RAG pipeline natively in n8n gives you more control and a deeper understanding of the process. This tutorial focuses on a pure n8n implementation for maximum flexibility.
Prerequisites
Before we start, make sure you have the following:
- n8n instance: A self-hosted or cloud account.
- Google Drive API access: For document monitoring and retrieval.
- Pinecone account: The free tier works perfectly for this setup.
- OpenAI API key: For generating embeddings.
Step 1: Get Your API Keys
First, you'll need to collect your API keys from Pinecone and OpenAI.
Pinecone Setup
- Create Account: Go to
pinecone.ioand create a free account. - Copy Credentials: In your dashboard, copy your API Key and Environment name.
- Create Index: Create a new index with the following settings:
Name: knowledge-base (or your preference)
Dimensions: 1536 (this is required for OpenAI's text-embedding-ada-002 model)
Metric: cosine
OpenAI Setup
- Go to
platform.openai.com. - Create a new API key and copy it.
Security Note: Keep your API keys secure. Use n8n's built-in credential management or environment variables instead of hardcoding them in your workflows.
Google Drive Setup
- Go to the Google Cloud Console and create or select a project.
- Enable the Google Drive API for your project.
- Create OAuth 2.0 credentials.
- In n8n, add a Google Drive credential and log in with OAuth to connect your account.
Step 2: Import the Workflow
Download the JSON file and import it into your n8n instance. This will create the complete workflow for you.
Download the JSON workflow hereGet Free n8n Workflows
Join the AI Client Machine newsletter and get weekly breakdowns of the exact n8n workflows that revive cold leads and book sales calls on autopilot.
Join the NewsletterStep 3: Configure Each Node
Go through each node in the imported workflow to add your credentials and check the settings.
Google Drive Trigger
- Connect your Google account.
- Set the trigger event to "File Created".
- Choose the folder you want to monitor.
Google Drive Download
- Select the same Google account.
- Operation should be set to "Download".
- File ID should be set using an expression:
={{ $json.id }}
Recursive Character Text Splitter
- Chunk Size:
500(a good starting point). - Chunk Overlap:
20(prevents losing context between chunks).
OpenAI Embeddings
- Add your OpenAI API key credential.
- Model:
text-embedding-ada-002
Pinecone Vector Store
- Add your Pinecone API key credential.
- Environment: Your Pinecone environment name.
- Index Name:
knowledge-base(or the name you chose). - Mode: Insert
Step 4: Test the Workflow
Now it's time to test your new RAG pipeline.
- Activate the workflow using the toggle in the top right.
- Upload a test document to your monitored Google Drive folder.
- Check your Pinecone index to see if the new vectors have been added.
Advanced Configuration & Troubleshooting
Here are a few tips for optimizing and troubleshooting your workflow.
Optimize Chunk Size
Adjusting chunk size based on document type improves retrieval accuracy. Here are some good starting points:
- Technical Docs: 800-1000 characters
- Marketing Content: 1200-1500 characters
- Legal Documents: 600-800 characters
Common Issues
- Pinecone connection failed: Check your API key, environment, and index name. Verify the index dimensions are 1536.
- OpenAI rate limit exceeded: Add a delay node in your workflow for bulk processing or consider upgrading your OpenAI plan.
- Text splitting failed: Ensure your file is UTF-8 encoded and not corrupted.
Next Steps
This workflow is just the beginning. The real power comes from building a second workflow to query this knowledge base. From there, you can:
- Build AI agents that reference this knowledge for decision-making.
- Add more data sources like web pages, databases, and other APIs.
- Set up automated cleanup systems to manage storage costs.